【8% OFF】How Can I Buy the Best Philippines eSIM in 2026?


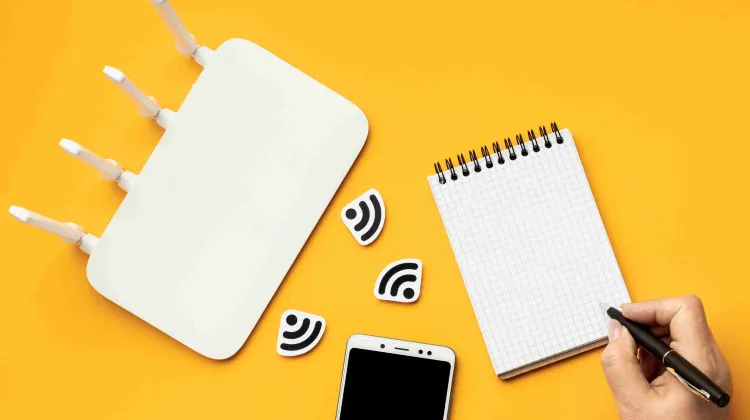
Using an eSIM Philippines lets you stay connected without a physical SIM.
Quick guide: 1) Check if your phone supports eSIM. 2) Buy a Philippines eSIM online. 3) Scan the QR code or use the carrier app to activate. 4) Enjoy mobile data immediately—no SIM swap needed. Ideal for tourists seeking hassle-free connectivity.
【8% Off】BEST eSIM Philippines Plans 2026
- CountryPhilippines
- Package Option500MB/Day
- Number of Days1 Day
- PriceUS$2.64
- CountryPhilippines
- Package Option1GB/Day
- Number of Days7 Days
- PriceUS$11.62
- CountryPhilippines
- Package Option10GB
- Number of Days30 Days
- PriceUS$16.11
*Day calculation method: every 24 hours is one day. (Example: If the 3-day package is installed and activated at 10:00 on October 1, the package will end at 09:59 on October 4) eSIM expires within 90 days from the date of purchase.
What Is eSIM Philippines & How Does It Work?
A Philippines eSIM allows travelers to connect to local mobile networks without a physical SIM card, avoiding the hassle of buying one locally or paying high roaming fees. Industry data from GSMA (2025) shows that over half of consumers aware of eSIM technology used it for international travel at least once, highlighting its growing popularity.
What Are the Best Philippines eSIM Providers for 2026?
Choose the best connection types for your visit to Philippines
When it comes to staying connected during your travels in the Philippines, there are several eSIM providers to choose from.
Among these, Trip.com eSIM Philippines stands out as the most affordable option, offering a wide range of plans with fast speeds to fit any traveler’s needs.
Let’s take a closer look at how Trip.com compares to other popular providers like Smart, Globe, and Billion Connect.
Trip.com eSIM
Trip.com is the best choice for budget-conscious travelers looking for reliable connectivity. They offer highly flexible data plans, ranging from 500MB to 20GB, with different validity periods—from 1 day to 30 days—allowing you to pick the right plan for your trip. Trip.com offers some of the cheapest eSIM options available, with plans starting at just $2.64 for a 1-day, 500MB plan, $11.62 for 1GB per day over 7 days, and $16.11 for 10GB over 30 days.
Plus, they often offer deals and discounts—like until Dec 2024, they had an 8% discount on eSIMs and attraction tickets, so it’s worth keeping an eye out for the latest offers to save even more.
Trip.com’s eSIM is quick to activate using a QR code, and the speed is consistently fast, making it ideal for streaming, video calls, and social media. Trip.com supports 5G, 4G/LTE, 3G, and 2G technologies, with data sharing/hotspot capabilities.
Smart
Smart is the largest mobile network in the Philippines and is known for its excellent coverage across the country. They offer up to 21GB of data bundled with PHP 300 (about $18) worth of calls and texts, providing extensive coverage, particularly for long-term travelers who need both voice and data. However, customer support is available only via phone call.
Globe
Globe is the second-largest network operator in the Philippines and is great for those traveling to more remote areas, thanks to its wide coverage. Their plans offer 80GB of data with unlimited calls and texts to all Philippine networks, making it a good choice for those who need extensive voice communication in addition to data. The plan costs around $32 for 30 days of coverage. Globe also supports 5G, 4G/LTE, 3G, and 2G, and like Smart, their customer support is via call only.
Billion Connect
Billion Connect is an international provider that partners with local carriers to provide reliable data plans for travelers. They offer a flexible pay-per-GB option, starting at $2.90 per GB for up to 20GB over a 30-day period. They use high-speed 4G networks and are ideal for travelers who don’t need voice services and just want affordable, flexible data for the duration of their stay. Activating the eSIM is straightforward, involving a quick scan of a QR code.
How to Get eSIM Philippines?

How to get Philippines eSIM?
Getting an eSIM for your trip to the Philippines is super straightforward, and it’ll save you a lot of headaches compared to the usual SIM card hassles. Here’s how you do it:
First things first, make sure your phone can actually use an eSIM. Not all phones have the feature, but most newer ones do. You can easily check by dialing *#06# on your phone—if an "EID" number shows up, you’re all set. Next, head over to Trip.com Philippines eSIM and pick out a data plan that works for you. They’ve got everything from 500MB per day to 10GB for 30 days, so there’s something for every kind of traveler.
Here’s a closer look at the available plans on Trip.com:
Option Type | Number of Days | Price (USD) |
500MB/Day | 1 day | $2.64 |
1GB/Day | 7 days | $11.62 |
10GB (total) | 30 days | $16.11 |
Once you make the purchase, they’ll send you a QR code by email. This is the key to getting your eSIM up and running. Just keep that QR code handy, because you’re going to need it in a moment to activate the eSIM on your device. It’s always best to do this when you’ve got a solid Wi-Fi connection—like at home or in your hotel before you head out exploring.
Device Details | |
Hot Spot Sharing | Available |
Operator | SMART |
Data Only | No voice calls or SMS; apps like Google Maps, Facebook, Twitter, Instagram, LINE, and WhatsApp are supported |
How to Use eSIM Philippines?

Learn how to use your eSIM in Philippines
- Connect to Wi-Fi: Before starting, make sure you have a stable Wi-Fi connection, as you’ll need it to download and install the eSIM.
- Install the eSIM:
Device | Activation Steps |
iPhone | Go to Settings > Cellular Data > Add a Cellular Network Plan |
Android | Go to Settings > Network & Internet > Add eSIM (path may vary) |
- Scan the QR Code: Use your phone to scan the QR code that you received from Trip.com. Make sure you don’t use your camera app—use the option under your phone settings. Alternatively, you can manually enter the SM-DP+ address and activation code if needed.
- Activate After Arrival: After scanning the QR code, you can rename the eSIM to something like “Philippines eSIM” for easy identification. Once you’re in the Philippines, turn on the eSIM and make sure Data Roaming is enabled to start using it.
- APN Settings: If you’re having trouble connecting to the internet, check your APN settings. For this eSIM, the APN is mobile.three.com.hk. Make sure it’s correctly set under Cellular Plan > Cellular Data Network.
- Important Notes: Remember that the eSIM can only be installed once. If you remove it, you won’t be able to reinstall it, and a new one will have to be purchased. Also, it’s best to install the eSIM only on the device you plan to use throughout your trip.
If My Phone Supports eSIM Philippines
To use an eSIM, your device must be carrier-unlocked and eSIM-compatible.
Please make sure your mobile phone support eSIM before purchase, and there is no refund for cancellations due to incompatible devices.
To check whether the mobile phone supports the eSIM function, you can dial * #06#. If EID is displayed, it generally means that eSIM is supported.
(Depending on the OS and manufacturer, even if EID meets the requirements, it may not be available due to the specifications of the device. )
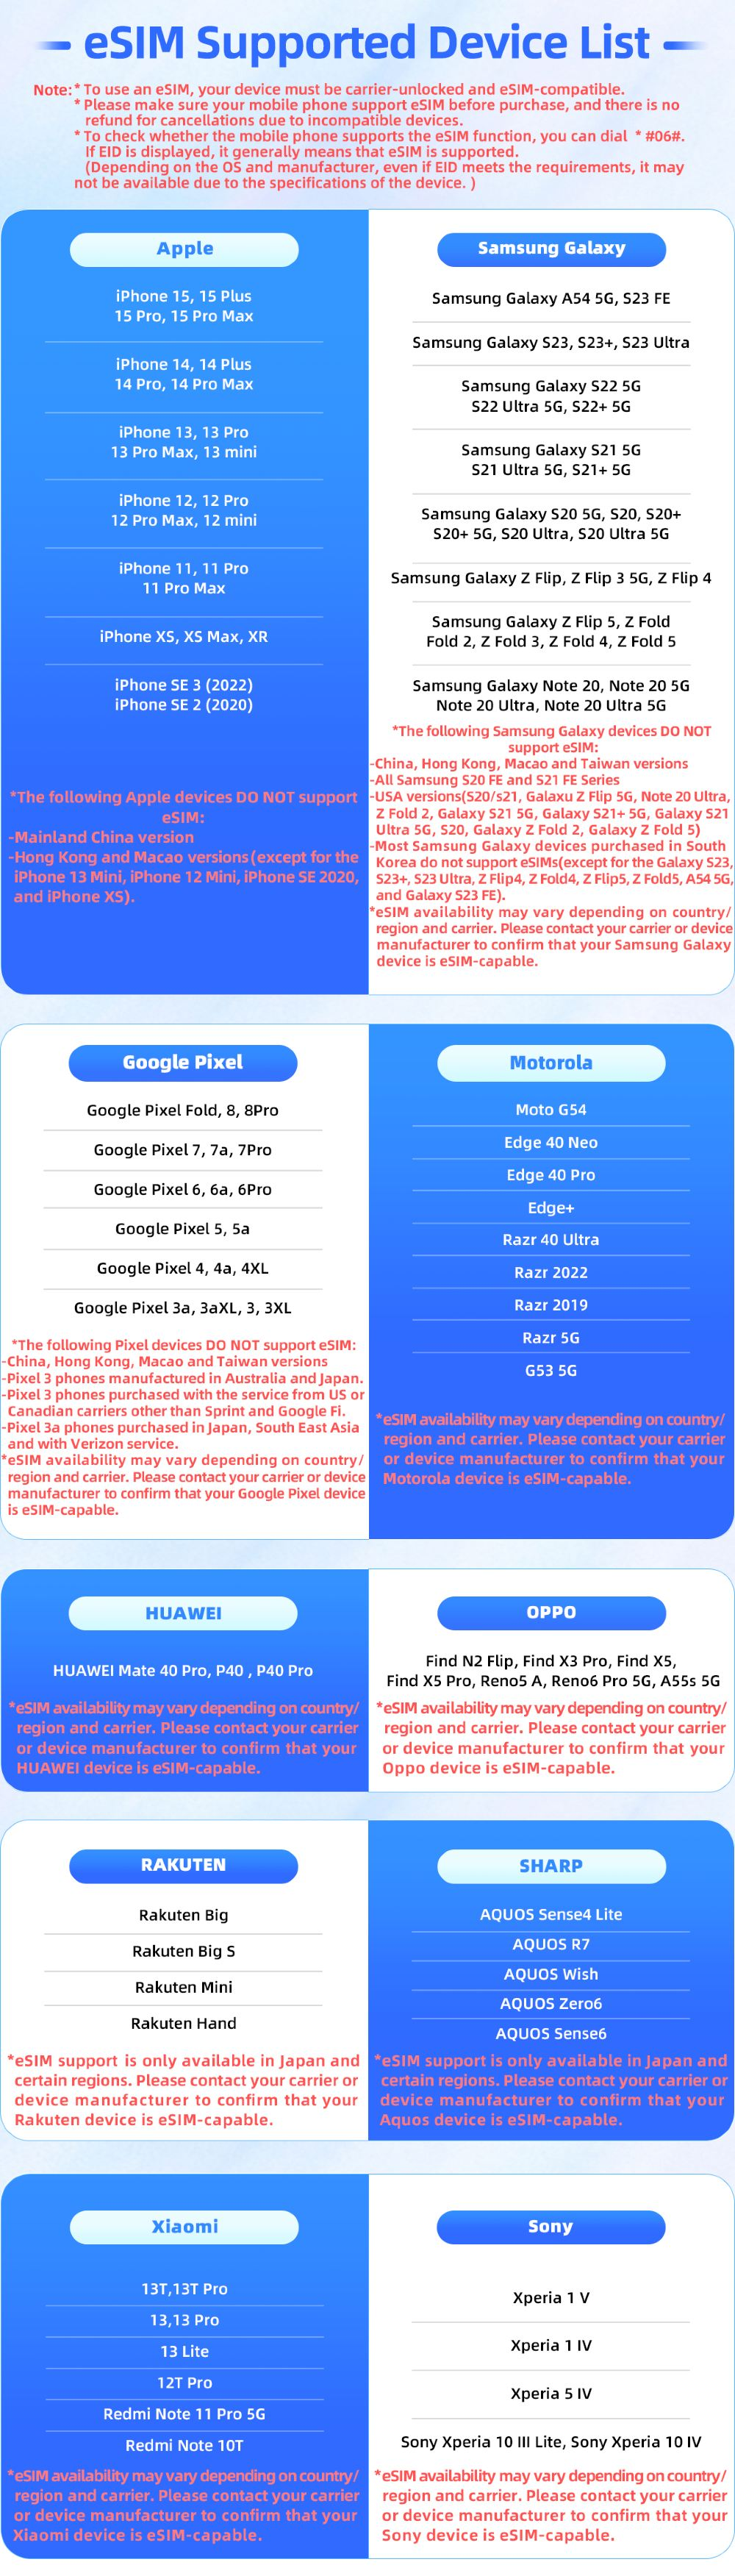
Check if your phone is supported to use eSIM
Tips for Using Your eSIM in Philippines
Learn tips for using eSIM Philippines
- Data-Only Plan: Just a heads-up—this Philippines eSIM is data-only, so it won’t give you a local number for calls or texts. But honestly, that’s not a big deal when you can just use WhatsApp, Facebook, or Instagram to keep in touch.
- Hotspot Sharing: Need to keep more than one device online? No problem—you can share your data with other devices by using your phone as a hotspot. It’s great for when you’re traveling with friends and everyone needs to get online.
- Validity: Your eSIM is good for 90 days from the purchase date, so you can activate and use it whenever during your trip. Just remember, once you activate it, the data package starts ticking down.
A word of advice—once you install the Philippines eSIM on your phone, don’t delete it. If you remove it, you won’t be able to reinstall it, and you’ll have to buy a new one. It’s a one-time setup, so make sure it stays on your device for the duration of your trip.
If you hit any bumps along the way—like trouble with activation or connecting to the internet—don’t stress. You can contact customer support at bc_support02@weitaige.com or on LINE at bc_support. They’re pretty quick to help, and they’ll guide you through any issues.
What to Choose: Philippines eSIM, SIM or Wi-Fi?

Choose the best connection options for your travel in Philippines
You’ve got a few options: eSIMs, local SIM cards, free Wi-Fi, portable Wi-Fi routers, and good ol’ roaming. Let’s break down each choice to see what’s best for you.
Option | Pros | Cons |
eSIM | Easy setup before travel, keeps original number active, flexible plans, affordable prices | Requires eSIM-compatible device |
SIM Card | Local rates, local number for calls and texts | Inconvenient to buy, requires swapping SIMs, lose access to home number |
Free Wi-Fi | Free in many places (cafés, hotels) | Unreliable, limited availability, potential security risks |
Wi-Fi Router | Connect multiple devices, portable internet everywhere | Expensive rental costs, extra device to carry, limited battery life |
Roaming | No setup needed, use your existing number | Very expensive, data costs add up quickly, unpredictable charges |
Philippines eSIM
Let’s start with the eSIM. Honestly, it’s probably the most convenient option out there. If you hate fiddling around with those tiny SIM cards or standing in line at a kiosk after a long flight, the eSIM is your new best friend. You can set it all up before you even leave home, so you’ll be connected as soon as you land. No wasted time, no stress—just a simple QR code to scan, and you’re ready to go. It’s also great because you can keep your original SIM active while using local data, which is a lifesaver if you need to stay reachable. Plus, the plans on Trip.com are super affordable, with plenty of options depending on how much data you need. If flexibility and ease are what you’re after, the eSIM wins hands down.
SIM card
Then there’s the local SIM card option. This is great if you’re planning on staying longer or want a local number for calls and texts. It’s pretty easy to grab a SIM from a store once you arrive, and the rates are usually pretty good for local usage. The downside is the hassle—finding the right store, maybe dealing with a bit of a language barrier, and having to swap out your current SIM, which means missing any calls or messages to your original number while using it.
Free Wi-Fi
Free Wi-Fi is the most budget-friendly option that we all love—cafés, hotels, airports, you name it. But here’s the thing: relying on free Wi-Fi can be hit-or-miss. Sometimes it’s smooth, but sometimes you’ll be staring at a buffering screen. If all you need is to quickly check in or scroll through social media while having your coffee, it works. But for anything serious or consistent, it’s not exactly reliable.
Wi-Fi router
If you need guaranteed, fast internet for multiple devices, a Wi-Fi router might be a solid choice. It’s a little box that acts as your personal hotspot, which means you can stay online pretty much anywhere. You can connect your phone, tablet, and even your laptop if you’re working on the go. But it’s also an extra device to carry, and the rental costs add up quickly—often more expensive than eSIMs or SIM cards, especially for solo travelers.
Roaming
Lastly, we have roaming, which is basically keeping your existing SIM card and using it abroad. This is convenient—no need to change anything—but it’s going to cost you a lot, especially if you use a lot of data. Roaming charges can add up fast, and I’d only recommend it if you’re in a real bind or don’t mind getting a shock when the bill arrives. It’s straightforward, sure, but it’s definitely not cheap.
In the end, the best option really comes down to your travel style. eSIM is hands-down the most convenient if you want a hassle-free setup and don’t mind spending a little bit to get good, reliable data. If you’re staying longer, a local SIM card works well, especially if you want a local number. If you’re trying to save, free Wi-Fi might work, but be prepared for some frustration. For groups or heavy internet users, a Wi-Fi router is reliable but costly. And if you’re fine with paying a premium for simplicity, roaming could be an option, but expect a hefty bill at the end of it. Whatever you choose, make sure it fits your needs, and you’ll be all set for a connected adventure in the Philippines!
What Advantages Does a Philippines eSIM Offer?

Know the benefits of using eSIM in Philippines
Using an eSIM in the Philippines has some major advantages, making it a popular choice for travelers who want to stay connected easily. The biggest benefit is convenience—you can set up your eSIM before you even leave home, which means you’re connected from the moment you land. No more waiting in line at a kiosk, no fiddling with those tiny SIM cards—it’s just a quick scan of a QR code, and you’re good to go. Plus, it keeps your original SIM active, which is a huge plus if you need to stay reachable by your usual number.
Another benefit is flexibility. With Trip.com, you have tons of options—from 1-day plans to 30-day packages, and anywhere from 500MB to 10GB of data. This means you can easily choose the plan that suits your needs, whether you’re a light user just wanting maps and messaging or a data-heavy user needing to upload photos and make video calls. The cost is also a huge draw, with plans that are often cheaper than getting a local SIM card, especially for short-term travelers.
Lastly, high-speed connectivity is a big win with eSIMs. You get access to reliable networks, meaning you can use apps like Google Maps, Instagram, and WhatsApp without any issues. You don’t have to deal with slow public Wi-Fi or worry about finding a local provider once you arrive. It’s the best way to make sure you stay connected smoothly throughout your trip.
Are There Any Disadvantages to Using an eSIM in the Philippines?

While eSIMs are incredibly convenient, they do have a few drawbacks. First off, not all devices support eSIMs, especially older models. You need to make sure your phone is eSIM-compatible, otherwise, you won’t be able to use it, which can be a dealbreaker if you have an older or budget phone.
Another drawback is that an eSIM is data-only. Unlike a traditional SIM card, you won’t get a local number for making voice calls or sending SMS messages. If you need to make calls while you’re there, you’ll have to rely on apps like WhatsApp or Skype. This isn’t a huge issue for everyone, but if you need a local number for work or other reasons, this might be a limitation.
Lastly, installation is a one-time process. Once you install your eSIM on your phone, you can't remove and reinstall it—that’s it. If you accidentally delete the eSIM from your device, you’re out of luck, and you’ll need to purchase a new one. It’s definitely something to keep in mind, especially if you’re not familiar with setting up eSIMs or are worried about making a mistake during installation.
Find the BEST eSIM Philippines for Travel

An eSIM is the ultimate connectivity companion for travel in the Philippines. With on-demand activation and great value mobile data on the three leading Filipino networks, eSIM lets you skip the SIM card hunt when you land in Manila, Boracay or Cebu.
You'll stay conveniently connected while freeing up that SIM slot for a local physical card too. Whether you need Google Maps to get around seaside towns or Facebook uploads from picturesque beaches, the best eSIM Philippines has your mobile data needs covered.
FAQs about eSIM Philippines
-
What is a Philippines eSIM?
-
Which devices support eSIM in the Philippines?
-
How do I activate a Philippines eSIM?
-
Can I use eSIM and a physical SIM at the same time?
-
Is a Philippines eSIM cheaper than roaming?
Trending Searches
-
eSIM/SIM card
-
Top destinations
-
Latest Flight Deals
-
Popular Attractions
- Hotels in Shanghai
- Hotels in Guangzhou
- Hotels in Beijing
- Hotels in Bangkok
- Hotels in Shenzhen
- Hotels in Hong Kong
- Hotels in Chongqing
- Hotels in Tokyo
- Hotels in Chengdu
- Hotels in Seoul
- Hotels in Ho Chi Minh City
- Hotels in Kuala Lumpur
- Hotels in Zhangjiajie
- Hotels in Hangzhou
- Hotels in Singapore
- Hotels in Xi'an
- Hotels in Hanoi
- Hotels in Bali
- Hotels in Istanbul
- Hotels in Osaka
- Forbidden City Tickets
- Shanghai Disneyland Tickets
- Shanghai Tower Tickets
- Shanghai Wild Animal Park
- Universal Studios Beijing Tickets
- Canton Tower Tickets
- Zhangjiajie National Forest Park
- Summer Palace Tickets
- Huangshan
- Shanghai Zoo Tickets
- Great Wall of China Tickets
- Yu Garden Tickets
- Ma Ling Tian Zhejiang
- Beijing Zoo Tickets
- Chimelong Safari Park