Trip.com E-Receipt: How to Access, Download & Use Your E-Receipt

by Trip.com
April 14, 2026
Learn everything about Trip.com e-receipts, including how to access, download, and use your e-receipt, and more.
to Bangkok
to Manila
to Shanghai
to Tokyo
to Seoul
See all flights
What is a Trip.com E-Receipt?
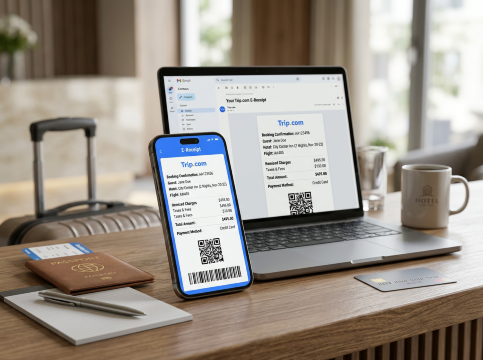
Trip.com E-Receipt
When booking flights and hotels on Trip.com, travellers receive a detailed e-receipt to help manage travel expenses. This e-receipt contains booking details, a cost summary, and payment information. It can be viewed and printed at any time. Trip.com ensures a fast and reliable service to make every booking transparent and traceable.
Note: The Trip.com e-Receipt is available only for flight and hotel bookings and is not supported for TNT (“Things to Do”) such as attraction tickets, transport tickets, eSIM, SIM cards, WiFi devices, tours, as well as car rentals, airport transfers, and gift cards.
How to Get an E-Receipt on Trip.com
Trip.com e-receipt
This article explains how to get an e-receipt from Trip.com, using the example of a flight booking. 👇👇👀
Step | Action |
Login | Open Trip.com app and log in. |
Select Booking | Go to "All Bookings" and choose your order. |
Request | Find "More Options" and select "E-Receipt". |
Receive | Enter your email and click "Send". |
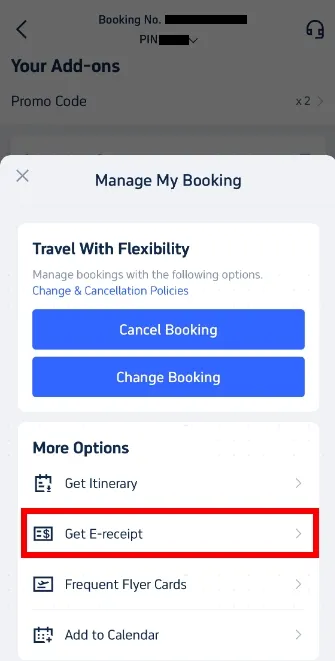
Get E-Receipt | Step 1: Manage My Booking
Open the Trip.com app and log in to your account. Tap 'My Bookings' to find the booking you want.
Go to ‘Manage My Booking’. Under the ‘More Options’ section, find and click the ‘Get a Receipt’ button.
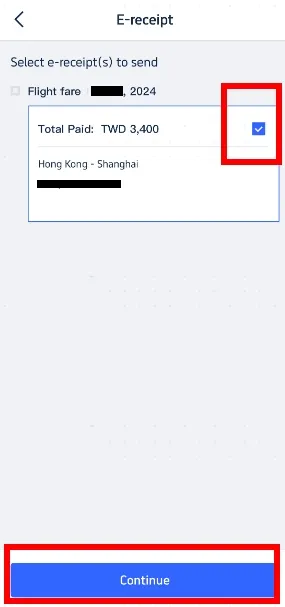
Get E-Receipt | Step 2: Select E-Receipts
On the receipt page, choose the flight e-tickets for which you want to obtain a receipt. Select the relevant e-tickets and click ‘Continue’.
💖If you're curious about how to stay connected fast at foreign airports, check Global eSIM, Wifi and SIM card!
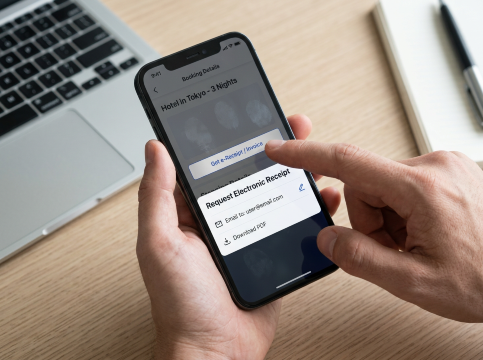
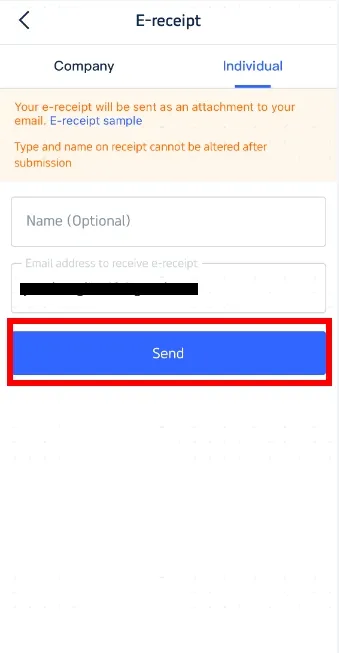
Get E-Receipt | Step 3: Enter Details for Receipt
To obtain an e-receipt, select "In Company Name" or "In Personal Name" in Trip.com APP.
If you are an individual, choose ‘Individual’. Input your name (optional) and email address where you want the e-receipt sent. Note that the type and name on the receipt cannot be altered after submission. Click ‘Send’ to proceed.
Note: Available only for flight and hotel bookings.
Not supported for TNT (“Things to Do”) such as attraction tickets, transport tickets, eSIM, SIM cards, WiFi, tours, as well as car rentals, airport transfers, and gift cards.
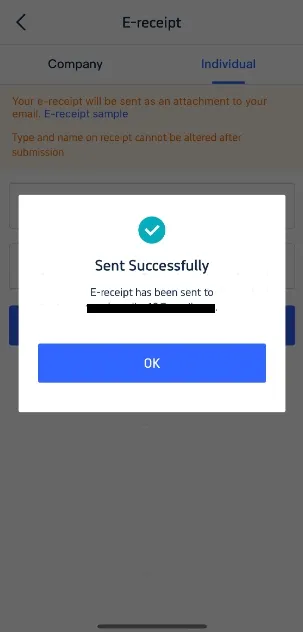
Get E-Receipt | Step 4: Confirm & Receive E-Receipt
You will receive a confirmation message stating that the e-receipt has been sent successfully. Click ‘OK’ and check your email to download your e-receipt. This e-receipt serves as your official receipt. Printing it is optional but can be useful for record-keeping.
See all attractions
 1427 booked


Additional Tips for Trip.com Receipts
- Check Your Spam Folder: If you don't receive your e-receipt in your inbox, check your spam or junk mail folder.
- Keep Your Email Updated: Ensure that your email address on your Trip.com account is current to receive all correspondence and receipts promptly.
- Store Digitally: Save your e-receipts on your device for easy access and future reference. This helps in managing and tracking your travel expenses efficiently.
That's how to get a Trip.com receipt. If you want to book a cheap flight ticket and need an e-receipt, use Trip.com!
[10% OFF] Global Hotel Recommendations
Find Best Global Hotels
See All Hotels


FAQs about Trip.com E-Receipt
-
Does Trip.com give an official receipt?
-
How to get an invoice from mytrip?
-
Is Trip.com a Chinese company?
Disclaimer: This article has been provided by an individual contributor or third party platform. If there is any discrepancy regarding the copyright, please contact us directly and we will delete the content immediately.
Trending Searches
-
Air Travel Guide
-
Latest Flight Deals
-
Popular Flight & Hotel Packages
-
Getting Around
-
eSIM/SIM card
- Zhangjiajie Vacation Packages
- Langkawi Vacation Packages
- Paris Flight and Hotel
- Tokyo Flight and Hotel
- Seoul Flight and Hotel
- Boston Vacation Packages
- Havana Vacation Packages
- Hong Kong Flight and Hotel
- Macau Vacation Packages
- Ipoh Vacation Packages
- Luxembourg Vacation Packages
- Cuenca Vacation Packages
- Abu Dhabi Vacation Packages
- Singapore Flight and Hotel
- Busan Vacation Packages
- ETC Card Japan
- Ningbo Metro
- Wakayama Transportation
- Ho Chi Minh Airport
- Urumqi Airport
- Hong Kong Airport Express
- Phuket Taxi
- Hong Kong to Macau
- Eurail Pass Discount
- Shanghai Hongqiao International Airport
- Incheon International Airport to Seoul
- Chengdu Metro
- Shanghai Airport Transfer
- Beijing Airports
- Macau to Hong Kong
- Narita Airport to Shinjuku
- Osaka Station to Kyoto Station